How To Secure Your App’s Passwords with Safari AutoFill in iOS 8
Learn how to use Safari AutoFill in iOS 8 to generate passwords, securely save passwords, and share and synchronize passwords between your app and website. By Matt Luedke.
Update 04/23/2015: Updated for Xcode 6.3 / Swift 1.2
Safari AutoFill in iOS 8 is a brilliant new feature, but before we get into what it does, do any of the following scenarios sound familiar?
- An app requires you to create a new password, and you proceed to type in your cat’s name, as you’ve done with every single site and app you’ve ever used.
- You already have an account with a website when you download their app. You’d like to keep your account consistent, but you can’t remember which email address you used to create it, or what the password is.
- An app requires that new passwords contain at least 99 characters, with at least one letter, five non-sequential numbers and a prime number of punctuation symbols, excluding ! and *.
Those scenarios are incredibly annoying for any user, and that’s crucial to consider as an app developer. Every insecure password is a liability, and every outlandish password requirement is motivation for a user to simply uninstall your amazing app.
Decreasing friction around passwords is not optional in regards to user-retention, yet, I would argue that you have a responsibility as a developer to help your users stay secure. Hackers and abusers are constantly staging attacks on activists, celebrities and John Q. Public. But fear not, Safari AutoFill in iOS 8 to the rescue!
In iOS 8, you can easily allow your users to:
- Save app passwords using Safari AutoFill
- Share and synchronize passwords between your website and your app
- Generate secure passwords
This article will show you how to implement these capabilities in your app, and you can follow along using a sample project that contains Swift, HTML and Python code.
Note: There are two important security-related prerequisites for linking a website to an app:
- You must own a domain with an SSL certificate. The price varies based from web host to web host, so check with your preferred choice for their pricing.
- An iOS Developer Program membership ($99 per year)
Getting Started
For this exercise, you’ll use a very simple website and corresponding iOS app called Ultra Motivator that provides an authenticated user with a motivational quote. Sadly, unauthenticated users will not find on demand inspiration through this app.
Note: This article is written in such a way that you can read through it without using the sample project if you’d prefer. The sample code is simply there as a reference :]
Note: This article is written in such a way that you can read through it without using the sample project if you’d prefer. The sample code is simply there as a reference :]
Clone or download the sample project from GitHub.
First, you’ll notice the code is divided into 3 directories:
- web: contains 3 simple webpages that use Python to access a MySQL database, plus a very short CSS file. These pages allow users to sign up, sign in and update a password.
- api: contains 3 API endpoints, again in Python, to expose the same database functionality to the app in JSON format.
- ios: contains a Swift project for iOS that accesses the API endpoints and makes use of Safari AutoFill features.
Once you’ve finished poking around in the sample project, the next step is to tell iOS to link the passwords from the website to the app!
The Website: Permissions
Since this whole concept is about being more secure, you must take specific steps to tell iOS to allow a specific domain and a certain app to share passwords.
On the website, you use an SSL-signed file populated with a simple JSON list of valid Bundle IDs that you want to allow AutoFill to access.
Ultra Motivator’s JSON looks like this:
{"webcredentials":{"apps":["F47X5999MK.com.upDownInteractive.UltraMotivator"]}}
You could put several Bundle IDs in the apps array if you like:
{"webcredentials":{"apps":["F47X5999MK.com.upDownInteractive.UltraMotivator","F47X5999MK.com.upDownInteractive.AnotherApp"]}}
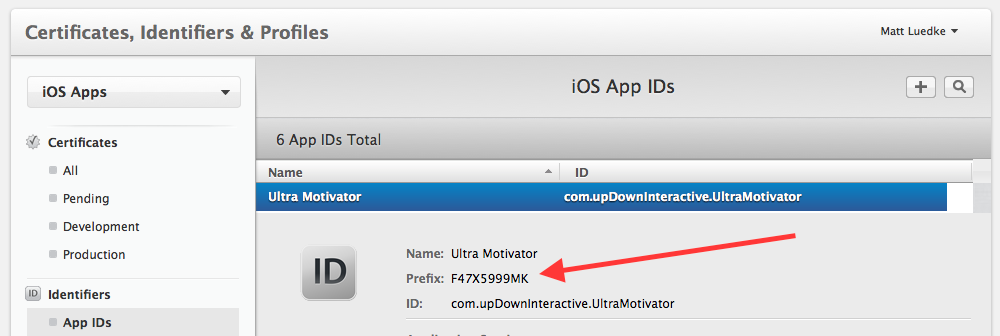
Note that each Bundle ID includes the Team ID prefix, which is provided and enforced by Apple when you enter the iOS Developer Program. You can find your prefix in the Member Center, by selecting Certificates, Identifiers & Profiles, then Identifiers, and then selecting an App ID, as shown here:
Once your Bundle ID is ready, create a file that contains only the JSON. You can do this in the Terminal by entering the following command:
echo '{"webcredentials":{"apps":["F47X5999MK.com.upDownInteractive.UltraMotivator"]}}' > json.txt
Next, you need to sign this file with your website’s SSL Certificate. Once you’ve purchased one, you can either install it yourself or ask your host to do it on your behalf.
Note: SSL Certificates are all the rage in security, and it looks like they will continue to be a big deal for some time. If you’re not already, get up to speed on how they work. Some suggested places to start are: Wikipedia, Mozilla Developer Network, the OpenSSL project, and Namecheap.
Note: SSL Certificates are all the rage in security, and it looks like they will continue to be a big deal for some time. If you’re not already, get up to speed on how they work. Some suggested places to start are: Wikipedia, Mozilla Developer Network, the OpenSSL project, and Namecheap.
To sign your JSON file, prepare the following resources:
- Your correctly-formatted JSON in a file (Ex: json.txt)
- Your private key (Ex: mattluedke.com.key). If your web host installed your SSL certificate, check your domain’s dashboard for this key. Your private key is secret to you (don’t share it!), and ensures your identity as the domain owner. It should look something like this:
-----BEGIN RSA PRIVATE KEY-----
XXXXXXXXXXXXXXXXXXXXXXXX
XXXXXXXXXXXXXXXXXXXXXXXX
XXXXXXXXXXXXXXXXXXXXXXXX
-----END RSA PRIVATE KEY-----
-----BEGIN CERTIFICATE-----
XXXXXXXXXXXXXXXXXXXXXXXX
XXXXXXXXXXXXXXXXXXXXXXXX
XXXXXXXXXXXXXXXXXXXXXXXX
-----END CERTIFICATE-----